
You have a great idea for a plastic part. But you feel lost. Where do you even start? Many buyers waste money on bad molds and slow suppliers. The wrong step early can cost you thousands later. I have seen this happen many times. Let me show you the clear path.
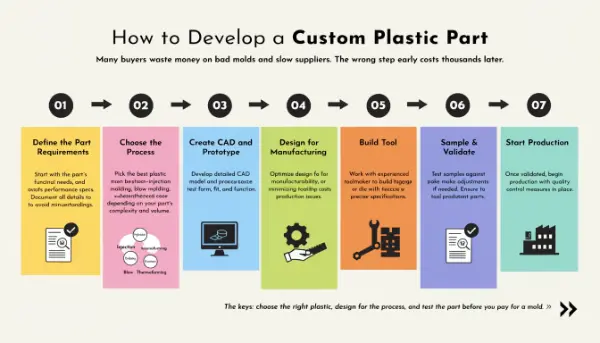
To develop a custom plastic part, follow seven main steps. First, define the part requirements. Second, choose the process. Third, create CAD and a prototype. Fourth, design for manufacturing. Fifth, build the tool. Sixth, sample and validate. Seventh, start production. The keys are picking the right plastic, designing for the process, and testing the part before you pay for a mold.
I have worked in molds for many years. I started in a mold factory. Later I built my own trading company. Along the way, I learned that most problems come from skipping steps. In this guide, I will break the process down for you. I will keep it simple. By the end, you will know how to move from an idea to a finished part with less risk.
How Do You Make a Custom Plastic Part?
You have the concept in your head. But turning it into a real part feels hard. Skip a step and you may face rework. Rework means more money and more time. I want to save you from that pain.
You make a custom plastic part by moving through clear stages. Start by defining what the part must do. Then pick the process, like injection molding or 3D printing. Build a CAD model and test a prototype. Refine the design for manufacturing. Build the mold tool. Run samples and check them. Once approved, begin full production. Each stage builds on the last, so a clear plan matters.
Start With the Use Case
I always begin with one question. What must this part do? I think about load, heat, chemicals, and how it looks. I write down the size, tolerance, color, and finish. I also note the yearly volume. This simple document stops costly redesigns later.
Move Through Each Stage
After the requirements, I pick the process. This choice shapes the whole design. Then I build a 3D CAD model. Next I make a prototype. A prototype lets me test fit and function before I spend big money.
Here is the practical order I follow:
| Step | Action | Goal |
|---|---|---|
| 1 | Define requirements | Know function and volume |
| 2 | Select material and process | Match need to method |
| 3 | CAD design | Build the 3D model |
| 4 | Prototype and test | Check fit and function |
| 5 | DFM review | Make it moldable |
| 6 | Build tooling | Create the mold |
| 7 | Sample and refine | Verify quality |
| 8 | Begin production | Scale up |
This flow keeps risk low. It also keeps my clients happy. Each step catches problems early, when they are cheap to fix.
What Is the Machine for Making Plastic Parts?
You know you need a machine. But which one? There are many types. Pick the wrong one and your part may cost too much. Or it may not meet your volume. Let me clear this up for you.
The main machine for making plastic parts is the injection molding machine. It melts plastic pellets and pushes them into a metal mold. This is the top choice for high volume and repeatable parts. For prototypes or low volume, you may use a 3D printer or a CNC machine instead. The process you pick decides the machine, and the machine decides your cost and speed.
Injection Molding Machines
I use injection molding for most large orders. The machine has two parts. One part melts and injects the plastic. The other part holds the mold and clamps it shut. The plastic cools inside the mold, then the part ejects. This runs fast and repeats well.
Other Machines for Small Runs
Not every job needs a molding machine. For a few dozen parts, I often use CNC machining or 3D printing. These need no mold. That saves the big upfront cost.
Here is how I compare them:
| Machine | Best For | Upfront Cost | Speed Per Part |
|---|---|---|---|
| Injection molding | High volume | High (mold) | Very fast |
| CNC machining | Low to mid volume | Low | Slow |
| 3D printing | Prototypes | Very low | Slow |
I always match the machine to the volume. If a client needs 50,000 units a year, injection molding wins. If they need only 30 parts, I steer them to CNC or 3D printing. The wrong machine wastes money. So this choice deserves careful thought early in the project.
How Much Does It Cost to Manufacture Plastic Parts?
Cost is often your biggest worry. You need clear numbers to plan. But quotes can feel confusing. Tooling, unit price, and hidden fees all mix together. I will help you see the full picture.
Plastic part cost has two main pieces. The first is the tooling cost, which is the price of the mold. This is a one-time upfront cost and is often the largest. The second is the unit cost, which covers material, machine time, and labor per part. Higher volume lowers the unit cost because the mold cost spreads across many parts. Material choice and part complexity also change the total.
Tooling Cost
The mold is the big upfront number. I build molds from steel or aluminum. Steel lasts longer but costs more. Aluminum is cheaper but wears faster. So volume drives this choice. This is also where design mistakes get expensive. A change after the mold is built can cost a lot.
Unit Cost and Volume
The unit cost drops as volume rises. This happens because the mold cost divides over more parts. Material and cycle time also matter here.
Here is a simple view:
| Cost Type | What It Covers | When You Pay |
|---|---|---|
| Tooling | Mold design and build | Once, upfront |
| Material | Plastic resin | Per part |
| Machine time | Cycle time on press | Per part |
| Labor | Setup and handling | Per part |
I tell clients to think about total cost, not just one number. A cheap mold may run slow and raise unit cost. A smart mold design lowers both risk and long-term cost. This is why I push for a good DFM review before cutting steel. It pays back many times over.
How Do You Manufacture a Plastic Product?
You have the design and the machine choice. Now you need to make real products. But mass production brings new risks. Quality can drift. Lead time can slip. I want your production to stay stable and smooth.
You manufacture a plastic product by moving from an approved sample into full production. First, build and test the mold with sample parts. Compare them to the drawing and fix any issues. Once approved, run production with a stable cycle time. Then add quality checks, packaging, and any assembly steps. For ongoing orders, set inspection rules and change control so quality stays the same across every batch.
Sample and Approve First
I never jump straight to production. I run sample parts from the new tool first. Then I check them against the drawing and tolerances. Some tuning is normal at this stage. I may adjust the mold or the process settings. Only after approval do I move forward.
Run Stable Production
Once samples pass, I focus on stability. I watch cycle time, quality, and packaging. I also plan any finishing or assembly work.
Here are the key focus points in production:
| Focus Area | Why It Matters |
|---|---|
| Cycle time | Keeps output steady |
| Quality checks | Catches defects early |
| Packaging | Protects parts in transit |
| Change control | Keeps quality the same |
For long programs, I set clear inspection frequency. I also lock down change rules. This stops small changes from causing big problems. I learned this the hard way early in my career. One small unrecorded change once caused a full batch to fail. Now I always document everything. Good records and clear rules keep production clean and predictable across many months.
Conclusion
Developing a custom plastic part follows a clear path. You define the part, pick the process, design it, and prototype it. Then you build the mold, sample it, and start production. The three keys are the right plastic, a design made for the process, and testing before the mold. Follow these steps and you cut risk, save money, and get a better part.