
You have a plastic part idea. But turning it into thousands of perfect units feels risky. One wrong material choice or mold mistake can cost you weeks and thousands of dollars. I have seen buyers lose big money on bad tooling. This guide walks you through the whole path, step by step, so you can avoid those traps.
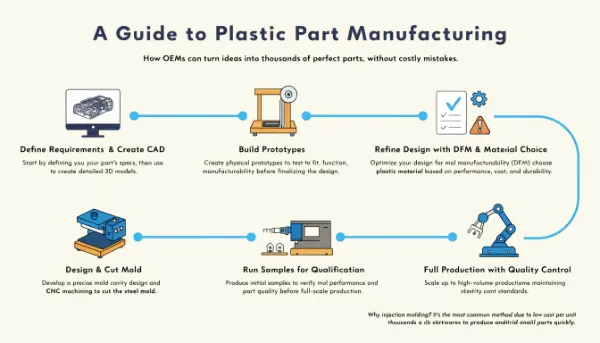
OEM plastic parts manufacturing usually follows six clear steps: define requirements and create CAD, build prototypes, refine the design with DFM and material choice, design and cut the mold, run samples for qualification, then move into full production with quality control. Injection molding is the most common method because it makes many parts at a low cost per unit.
I started my career on the floor of a mold factory. Later I built a trading company for molds and CNC parts. Along the way, I learned what makes a plastic part project succeed or fail. Let me share the full picture with you now.
How to Manufacture Plastic Parts?
You have a design in your head. But you are not sure how it becomes a real, usable part. Skip a step and you risk defects, delays, or wasted tooling money. I want to save you from that pain. Here is the clear path most OEM projects follow.
To manufacture plastic parts, you follow six main steps. First, define requirements and build a CAD model. Second, make prototypes to test fit and function. Third, refine the design with DFM and pick the right material. Fourth, design and cut the mold. Fifth, run samples and qualify the tool. Sixth, move into full production with ongoing quality checks.
The Six Core Steps
Let me break each step down so you know what happens and why it matters.
| Step | What You Do | Why It Matters |
|---|---|---|
| 1. Define + CAD | Set function, environment, tolerances; build a STEP model | Avoids wrong specs later |
| 2. Prototype | 3D print or CNC a sample to test fit | Catches errors before tooling |
| 3. DFM + Material | Fix wall thickness, draft, gates; pick resin | Prevents molding defects |
| 4. Mold Design | Build steel or aluminum tool | Shapes every part |
| 5. Sampling | Run short batches, measure, adjust | Qualifies the tool |
| 6. Production | Run full volume with QC | Keeps quality stable |
Injection molding sits at the heart of this. Plastic melts, fills the mold, cools, and ejects. This cycle repeats fast, so cost per part drops at high volume. For very low volumes or custom parts, 3D printing is a smart alternative. It skips the mold cost. Custom molds cost a lot upfront. But they cut your per-unit price once you order in large numbers. I always tell buyers to match the method to their volume. That one choice controls your whole budget.
What Are the 7 Categories of Plastic?
You pick a plastic without much thought. Then the part cracks, warps, or melts in use. That failure hurts your product and your reputation. Material choice is not a small detail. It decides how your part performs. Let me show you the main groups so you choose with confidence.
The 7 common plastic categories are PET, HDPE, PVC, LDPE, PP, PS, and a seventh "other" group that includes PC, ABS, and nylon. Each has its own strength, flexibility, heat resistance, and cost. Your choice controls durability, safety, and function. For OEM parts, ABS, polycarbonate, and polypropylene are popular because they balance strength, cost, and easy molding.
Matching Material to Your Part
Each plastic fits a different job. Here is a simple guide I use with clients.
| Plastic | Best For | Key Trait |
|---|---|---|
| ABS | Housings, casings | Tough, easy to mold |
| PC (Polycarbonate) | Clear covers, lenses | Strong, optical clarity |
| PP (Polypropylene) | Living hinges, containers | Flexible, chemical resistant |
| PET | Bottles, packaging | Clear, recyclable |
| HDPE | Rugged parts | Stiff, low cost |
| PVC | Pipes, fittings | Hard or soft, chemical resistant |
| PS | Simple parts | Cheap, brittle |
When I help buyers pick, I ask three questions. What does the part touch? What temperature does it face? What load does it carry? These answers narrow the list fast. For example, a car interior part near heat needs ABS or a high-heat blend. A clear light guide needs polycarbonate. A part that bends many times needs polypropylene for its living hinge. I also think about recycling. More OEM clients now want recyclable or sustainable resins. This trend grows each year. So I always weigh green options next to cost and strength. The right material saves you from field failures and returns. It is worth the extra thought at the start.
Who Is the Biggest Manufacturer of Plastic?
You want a strong supplier. But the market is huge and confusing. Big names, small shops, overseas factories. It is hard to know who leads and why it matters to you. Knowing the giants helps you understand supply chains and pricing. Let me explain the landscape.
The biggest plastic manufacturers are large chemical companies that make raw resin, not finished parts. Names like Dow, LyondellBasell, SABIC, and ExxonMobil lead global resin production. For finished OEM parts, no single factory dominates. China holds the largest share of injection molding capacity, with thousands of mold and molding factories serving global buyers.
Resin Makers vs Part Makers
You need to know the difference here. It shapes how you buy.
| Type | What They Make | Who You Deal With |
|---|---|---|
| Resin Producers | Raw plastic pellets | Rarely direct |
| Molders | Finished parts | Your main partner |
| Mold Makers | Tooling | Often bundled with molders |
The resin giants sell pellets in bulk. Your molder buys those pellets, then shapes them into your part. So when you source OEM parts, you work with molders, not the resin giants. This matters for pricing. Resin prices rise and fall with oil markets. When oil jumps, your part cost can climb too. I watch these trends to help clients time orders. On the part side, China leads in volume and price. But price is not everything. I always look at quality systems, communication speed, and IP protection. A cheap factory that leaks your design costs you far more later. So I tell buyers to judge a supplier on total value. Look at their DFM feedback, their sample quality, and how fast they answer your emails. A good partner supports you early in design. That saves cost before the mold is even cut. Size alone does not make a good supplier for your project.
How to Decide Parting Line in Plastics?
Your part looks great in CAD. But you forgot the parting line. Now you have ugly seams, flash, or a mold that cannot open. This small detail trips up many buyers. I have seen it delay projects for weeks. Let me make the parting line simple for you.
The parting line is where the two mold halves meet. To decide it, place it along the largest cross-section of the part so the mold can open and release the part cleanly. Choose a line that hides seams, allows proper draft on both sides, and avoids undercuts. A good parting line reduces flash, eases ejection, and keeps cosmetic surfaces clean.
Rules I Follow for Parting Lines
Setting the parting line is part science, part art. Here are the rules I use.
| Rule | Why It Helps |
|---|---|
| Place at widest section | Mold opens cleanly |
| Ensure draft both sides | Part ejects without drag |
| Avoid cosmetic faces | Hides visible seams |
| Dodge undercuts | Prevents complex slides |
First, I find the widest part of the shape. The mold must open along that line, or the part gets stuck. Second, I make sure both sides of the parting line have enough draft angle. Draft is the slight taper that lets the part slide out. Without it, the part drags and marks. Third, I keep the parting line off any surface the customer sees. A seam on a hidden edge is fine. A seam across the front face looks cheap. Fourth, I check for undercuts. An undercut is a feature that locks the part in the mold. These need side actions or lifters, which add cost. A smart parting line often avoids them. When I review a client’s CAD file, the parting line is one of my first checks. I mark it early and share it in the DFM report. This lets the buyer approve the look before we cut steel. That one conversation prevents surprises and rework. Good parting line planning keeps your part clean and your tooling cost low.
Conclusion
OEM plastic parts follow six clear steps: define and CAD, prototype, DFM and material choice, mold design, sampling, and production. Pick the right plastic for the job. Work with a strong molder, not just the biggest name. Plan your parting line early to avoid ugly seams and extra cost. Get these basics right, and your project stays on time and on budget.