
You have a part design ready. You need thousands of copies. Every copy must look the same and work the same. But one wrong step in the mold, and you get flash, warping, or sink marks. That means wasted money and lost time. I have seen this happen too many times. Let me walk you through the process so you can avoid these traps.
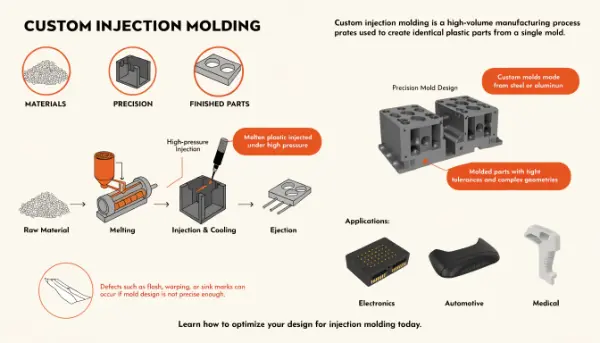
Custom injection molding is a high-volume process that melts plastic pellets, injects the molten plastic into a precision steel or aluminum mold under high pressure, then cools and ejects the part. The mold is built for your exact shape, tolerances, and features. This lets you make complex, repeatable parts fast. It works for small clips or large housings. It fits electronics, automotive, and medical products.
I spent years on the factory floor and later ran my own mold trading company. In that time, I learned that the process is simple to describe but hard to master. Below I break down each part in plain words. By the end, you will understand the steps, the cost, and the main molding types.
What Is the Injection Molding Process Step by Step?
Many buyers think molding is just "pour plastic in a mold." Then they get parts with defects and blame the supplier. The truth is that each step has a purpose. Skip one, and the whole batch fails. Understanding the flow helps you ask the right questions.
The injection molding process has seven main steps. First, you design and build a custom mold. Second, you prepare the plastic pellets. Third, you melt and meter the plastic. Fourth, you inject it into the closed mold under high pressure. Fifth, you hold the pressure to pack the material. Sixth, you cool the part until it hardens. Seventh, the mold opens and ejector pins push the part out. Then the cycle repeats, often in under a minute.
Let me go deeper on each step so you see why they matter.
The Full Sequence
The mold is the heart of the whole thing. We machine it to the exact negative shape of your part. It comes in two halves that meet at a parting line. Inside, we build the cavity and core, the runner system, the gates, the cooling channels, and the ejection system.
Then we prepare the material. Pellets go into a hopper. The hopper feeds a heated barrel with a rotating screw. The screw pushes the pellets forward. Heat and friction melt them into a smooth pool. The screw pulls back to store one "shot" of melt.
Next comes injection. The machine closes the mold and holds it shut with clamp tonnage. Then the screw acts like a plunger. It shoves the melt through the nozzle into the cavity. Pressure can reach 25,000 psi.
| Step | Goal | Common Problem If Skipped |
|---|---|---|
| Design & mold build | Exact part shape | Wrong dimensions |
| Melt & meter | Uniform plastic | Air bubbles |
| Inject | Fill cavity | Short shot |
| Pack & hold | Beat shrinkage | Sink marks |
| Cool | Solid part | Warping |
| Eject | Remove part | Damage or sticking |
After the part fills, holding pressure packs in more material to fight shrinkage. Then cooling channels pull the heat out. Cooling takes the most time. Last, the mold opens and ejector pins push the part free. The mold closes again for the next shot.
What Is the Hourly Rate for Injection Molding?
You get a quote and see an hourly machine rate. It looks high. You wonder if the supplier is padding the number. This confusion makes negotiation hard. Knowing what drives the rate helps you compare quotes fairly.
The hourly rate for injection molding usually ranges from about $20 to $100 per hour. Small machines with low clamp tonnage sit at the low end. Large machines with high tonnage cost more. The rate covers the machine, the operator, energy, and overhead. It does not include the mold cost or the material. Your total part price depends on cycle time, cavities per shot, and volume.
Let me explain what shapes this number so you can read a quote like an insider.
What Drives the Rate
The machine size matters most. A bigger machine needs more clamp force to hold the mold shut against injection pressure. More force means more energy and a higher rate. So the rate climbs with tonnage.
Cycle time is the second key factor. If one cycle takes 30 seconds, you make more parts per hour. That spreads the hourly cost over more parts. So a faster cycle means a lower cost per part, even at the same hourly rate. Cooling time drives most of the cycle, so good cooling design saves you money.
Cavity count also helps. A four-cavity mold makes four parts per shot. That cuts the effective machine cost per part by four.
| Factor | Effect on Cost |
|---|---|
| Machine tonnage | Higher tonnage, higher rate |
| Cycle time | Faster cycle, lower part cost |
| Cavity count | More cavities, lower part cost |
| Automation | Robots cut labor cost |
| Location | Overseas rates often lower |
Here is my advice. Do not focus only on the hourly rate. Ask for the cycle time and the number of cavities. Then work out the real cost per part. That number is what you should compare across suppliers.
What Is the 2K Process?
Your product needs two colors or two materials in one part. Or it needs a soft grip on a hard body. You could mold two parts and glue them. But that adds cost, weak joints, and assembly steps. There is a better way.
The 2K process, also called two-shot or double-injection molding, molds two different materials or colors into one single part in one machine cycle. The machine injects the first material to form the base. Then a second unit injects the second material over or around the first. The result is a bonded, single part. It removes glue, screws, and extra assembly. It is common for soft-touch grips, seals, and multi-color buttons.
Let me show you why this process is worth the extra tooling cost.
How 2K Works and Why It Helps
The 2K machine has two injection units. It also has a rotating platform or a moving core. First, the machine injects material one into the first cavity. This forms the base shape. Then the platform rotates the base to a second cavity. The second unit injects material two over the base. The two materials bond at the interface as they cool.
The bond can be chemical or mechanical. Some material pairs stick well by chemistry, like PC and TPU. Others need locking features cut into the design. Choosing the right pair is the hardest part. I always test bond strength on a prototype first.
| Use Case | First Material | Second Material |
|---|---|---|
| Toothbrush handle | Hard PP | Soft TPE grip |
| Seal on housing | ABS | TPE gasket |
| Two-color button | ABS (color 1) | ABS (color 2) |
The main benefit is no assembly. You save labor and remove weak glue joints. The main cost is a more complex, more expensive mold and machine. So 2K pays off best at high volume. For a small run, two separate parts may cost less. I help clients run this math early, before we cut steel.
What Are the 4 Types of Moulding?
You hear terms like blow molding, injection molding, and rotational molding. It gets confusing. Picking the wrong method wastes money and gives poor parts. Knowing the four main types helps you choose the right one for your product.
The four main types of molding are injection molding, blow molding, compression molding, and rotational molding. Injection molding shoots melted plastic into a closed mold for solid, detailed parts. Blow molding inflates hot plastic into a hollow shape like a bottle. Compression molding presses material in an open mold with heat. Rotational molding spins a mold to coat the inside for large hollow parts like tanks.
Let me break down each type so you know when to use which.
The Four Methods Compared
Injection molding is the one I focus on. It makes solid parts with tight tolerances and fine detail. It runs fast and fits high volume. Think gears, housings, and clips.
Blow molding makes hollow parts. It heats a plastic tube, then blows air to press it against the mold wall. Think water bottles and containers. It is cheap for thin hollow shapes.
Compression molding puts material in an open, heated mold. Then a press closes and squeezes it into shape. It works well for thermosets and rubber. Think seals and large flat panels.
Rotational molding puts powder in a hollow mold. The mold heats and spins on two axes. The powder melts and coats the inside evenly. Think large tanks and playground slides.
| Type | Best For | Detail Level | Volume |
|---|---|---|---|
| Injection | Solid precise parts | High | High |
| Blow | Hollow bottles | Medium | High |
| Compression | Rubber, thermosets | Medium | Low–Medium |
| Rotational | Large hollow tanks | Low | Low |
My rule is simple. If you need detail and volume, pick injection molding. If you need a hollow shape, look at blow or rotational molding. Match the method to your part shape and volume first. That choice shapes your whole cost and lead time.
Conclusion
Custom injection molding melts plastic, injects it into a custom mold, then cools and ejects a precise part. The hourly rate depends on machine size, cycle time, and cavities. The 2K process joins two materials in one part. And injection is one of four main molding types. Know these basics, and you will quote smarter and choose the right supplier.
For an active program, review our DFM-to-production injection molding services and prepare the current CAD and drawing package.